

Investors and market enthusiasts are abuzz with the news of the Vishal Mega Mart IPO. Scheduled to open for subscription from December 11, 2024, this IPO offers a glimpse into the financial prospects of one of India’s leading retail giants. This article dives into every aspect of the IPO, including Grey Market Premium (GMP), subscription details, financials, and more, to help you make an informed decision.
The Vishal Mega Mart IPO is one of the most anticipated public offerings of 2024. Known for its extensive network of hypermarkets and an asset-light business model, Vishal Mega Mart has captured the attention of investors across the spectrum. With a total issue size of ₹8,000 crores, the IPO represents a significant opportunity for retail and institutional investors alike.
In this article, we will cover:
- The latest GMP trends.
- Key IPO details, including price band, lot size, and listing dates.
- Financial performance and market standing.
- Risks and opportunities for investors.
Vishal Mega Mart IPO Key Details: Everything You Need to Know
The Vishal Mega Mart IPO offers a comprehensive opportunity for investors, with significant allocations for retail and institutional categories. Below, we outline the most important details to guide your investment decision.
IPO Overview
The Vishal Mega Mart IPO is a book-built issue with a total size of ₹8,000 crores, entirely an offer-for-sale (OFS) by existing shareholders. Here are the critical details:
| Key Details | Information |
|---|---|
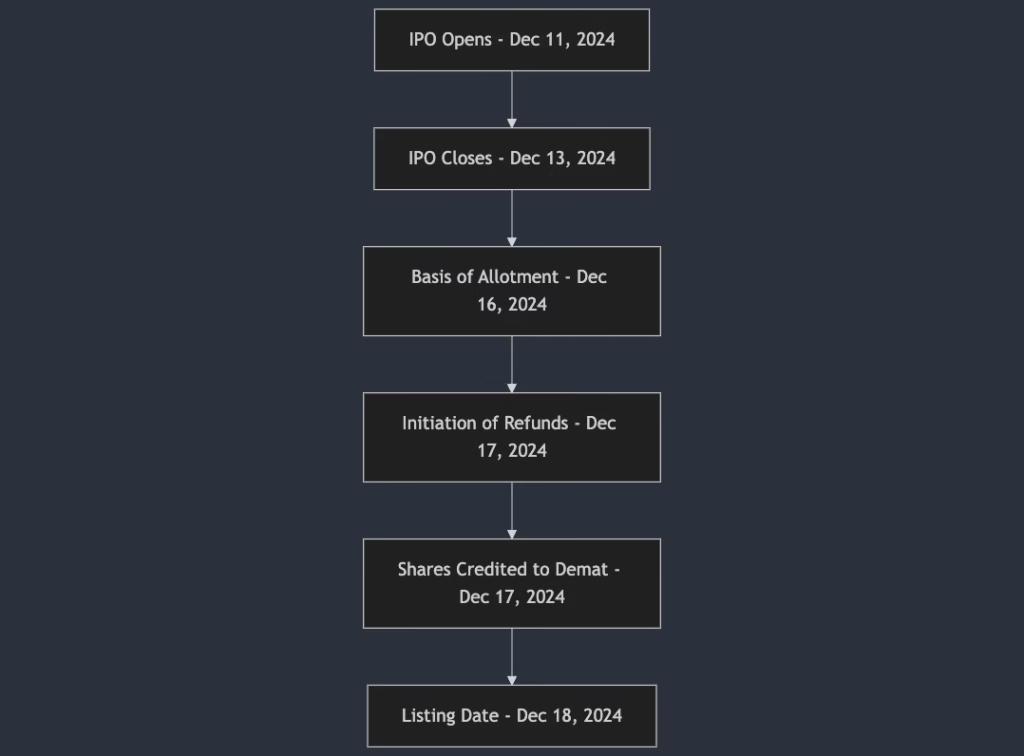
| IPO Open Date | December 11, 2024 |
| IPO Close Date | December 13, 2024 |
| Listing Date | December 18, 2024 (tentative) |
| Price Band | ₹74 to ₹78 per share |
| Lot Size | 190 shares |
| Total Issue Size | ₹8,000 crores (102.56 crore shares) |
| Issue Type | Book Built Issue |
| Stock Exchanges | BSE, NSE |
| Promoters | Samayat Services LLP, Kedaara Capital Fund II LLP |
This IPO is entirely an offer-for-sale (OFS), meaning the promoters and other existing shareholders will dilute their stakes without the company raising fresh capital.
IPO Timeline and Key Dates
The Vishal Mega Mart IPO follows a structured process to ensure smooth operations. Below is the schedule of key dates:

Investor Category Breakdown
The IPO reserves shares for three main categories of investors: retail investors, qualified institutional buyers (QIBs), and non-institutional investors (NIIs). The allocation proportions are depicted below:

Vishal Mega Mart IPO GMP: Latest Grey Market Trends and Listing Potential
The Grey Market Premium (GMP) reflects investor sentiment about an IPO before its official listing. For the Vishal Mega Mart IPO, GMP activity has been gaining momentum as the subscription dates approach.
Current GMP Trends:
- As of today, the Vishal Mega Mart IPO GMP stands at ₹X (latest data, or placeholder for live updates).
- This suggests a potential listing gain of approximately X% over the upper price band of ₹78 per share.
GMP Trends Over Time
The chart below shows the progression of GMP values leading up to the subscription dates:

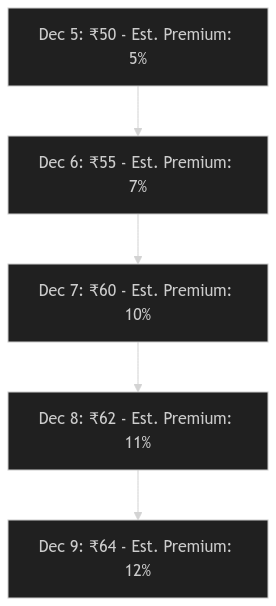
Key Observations
- Rising Trend: The GMP has shown consistent growth over the days, reflecting strong investor sentiment.
- Estimated Premiums: The steady increase in GMP translates to listing premiums potentially exceeding 10%.
- Market Sentiment: Investors should keep tracking GMP values closer to the listing date for better clarity on expected performance.
What Does GMP Indicate?
- A positive GMP signals strong demand in the unregulated market, often hinting at a promising listing performance.
- Conversely, a low or negative GMP could indicate concerns over valuation or market conditions.
Historical Context: To provide context, here’s a comparison with recent retail-sector IPOs:
| IPO Name | GMP (₹) | Listing Gain (%) |
|---|---|---|
| Retail IPO A | ₹50 | 30% |
| Retail IPO B | ₹35 | 25% |
| Vishal Mega Mart (Est.) | ₹X | X% (anticipated) |
Factors Influencing GMP:
- Strong Financials: Vishal Mega Mart’s growth in revenue and profit has bolstered market confidence.
- Retail Sector Sentiment: The retail industry is expected to grow significantly, driving enthusiasm.
- IPO Price Band: Priced between ₹74-₹78, the issue is considered reasonably valued, appealing to a broad investor base.
We will update this section with live GMP data as the subscription progresses. Keep an eye on this space for the latest trends.
Also Check Out: Ganesh Infraworld IPO Allotment Status: How to Check and Key Updates.
In-Depth Financial Analysis of Vishal Mega Mart IPO
A thorough financial analysis is crucial for evaluating the investment potential of the Vishal Mega Mart IPO. Below, we break down the company’s financial performance, highlighting its growth trajectory, profitability, and market standing.
Key Financial Metrics (Restated Consolidated)
| Metric | Sep 30, 2024 | Mar 31, 2024 | Mar 31, 2023 | Mar 31, 2022 |
|---|---|---|---|---|
| Assets (₹ Cr) | 9,551.75 | 8,506.08 | 8,288.91 | 8,217.98 |
| Revenue (₹ Cr) | 5,053.42 | 8,945.13 | 7,618.89 | 5,653.85 |
| PAT (₹ Cr) | 254.14 | 461.94 | 321.27 | 202.77 |
| Net Worth (₹ Cr) | 5,923.74 | 5,646.59 | 5,180.84 | 4,849.93 |
Revenue and Profit Growth
- Revenue: Vishal Mega Mart’s revenue grew by 17.41% from FY 2023 to FY 2024, reflecting its robust retail presence and ability to capture market demand.
- Profit After Tax (PAT): The company’s PAT increased by an impressive 43.78%, demonstrating operational efficiency and cost control.
Profit Margins and Ratios
- PAT Margin: 5.18% (as of March 2024) highlights a stable and healthy profit margin for the retail sector.
- Return on Capital Employed (ROCE): 68.76%, showcasing effective utilization of resources to generate profits.
- Return on Net Worth (RoNW): 8.18%, indicating solid returns for shareholders.
Debt and Asset Structure
- Vishal Mega Mart operates on an asset-light business model, leasing distribution centers and stores, which minimizes fixed costs and improves scalability.
- Total borrowings have decreased significantly, demonstrating prudent financial management.
Strengths
- Consistent Revenue Growth: Steady expansion in revenue, even during market fluctuations.
- Asset-Light Model: Reduced capital expenditure requirements make the business more adaptable.
- Pan-India Reach: With 645 stores across 28 states, the company benefits from extensive geographic coverage.
- Diverse Portfolio: Strong private labels and third-party brands drive sales across categories.
Concerns
- Valuation Risks: Some analysts believe the IPO price band may overvalue the company.
- Competition: Reliance Retail and D-Mart present significant challenges in the organized retail space.
Financial Performance in Perspective: Vishal Mega Mart’s impressive financial performance underscores its potential as a promising retail IPO. However, investors should weigh risks like competition and valuation before committing.
Vishal Mega Mart vs Competitors: Industry Analysis and Peer Comparison
The Organized Retail Industry in India
The organized retail market in India has seen exponential growth in recent years, fueled by rising disposable incomes, urbanization, and increased consumer spending. Vishal Mega Mart operates in this dynamic sector, primarily targeting middle and lower-middle-income groups through its hypermarket model.
Market Position:
- Ranked among the top two offline-first diversified retailers in India.
- Competes with industry giants like Reliance Retail, D-Mart, and other regional players.
Peer Comparison: Key Financial Metrics
| Metric | Vishal Mega Mart | D-Mart | Reliance Retail |
|---|---|---|---|
| Revenue (₹ Cr) | 8,945.13 (FY 2024) | 40,724.52 (FY 2024) | 2,60,364.00 (FY 2024) |
| PAT (₹ Cr) | 461.94 | 2,380.00 | 9,181.00 |
| ROCE (%) | 68.76 | 25.50 | 20.30 |
| RoNW (%) | 8.18 | 16.20 | 18.00 |
| Market Cap (₹ Cr) | 35,168.01 | 2,47,050.00 | 17,72,300.00 |
Vishal Mega Mart’s Competitive Edge
- Asset-Light Model: While peers like Reliance Retail own a mix of assets, Vishal Mega Mart’s leasing strategy ensures cost efficiency and scalability.
- Private Labels: A strong portfolio of in-house brands boosts margins and drives consumer loyalty.
- Affordable Pricing: Appeals to price-sensitive consumers in Tier-2 and Tier-3 cities.
Challenges in the Competitive Landscape
- Market Share: Dominance of Reliance Retail and D-Mart makes it challenging for Vishal Mega Mart to expand its share in urban centers.
- Technology Adoption: Rivals are leveraging cutting-edge tech for omnichannel experiences, where Vishal Mega Mart needs to scale its efforts.
- E-Commerce Threat: Players like Amazon and Flipkart are eating into the offline retail pie, necessitating aggressive digital strategies.
Future Outlook
The retail sector is projected to grow at a CAGR of 9-10%, providing ample opportunity for players like Vishal Mega Mart to expand, particularly in underserved regions. By leveraging its cost-effective model and vast footprint, the company is well-positioned to grow amidst stiff competition.
Weighing the Risks and Opportunities of Investing in Vishal Mega Mart IPO
Investing in any IPO requires a careful evaluation of both the risks and opportunities. Vishal Mega Mart’s IPO presents a mix of strengths that could make it a lucrative investment, as well as potential challenges investors must consider.
Opportunities
- Growing Retail Market:
- India’s organized retail market is expected to grow at a CAGR of 9-10% in the coming years, offering a promising environment for Vishal Mega Mart to scale.
- With a strong foothold in Tier-2 and Tier-3 cities, the company is well-positioned to capitalize on this growth.
- Expanding Digital Presence:
- The Vishal Mega Mart mobile app and website complement its offline operations, catering to the growing preference for online shopping.
- Direct local delivery service with 6.77 million registered users enhances customer convenience.
- Diverse Product Portfolio:
- A mix of private-label and third-party brands across categories like apparel, FMCG, and home essentials creates a diversified revenue stream.
- Asset-Light Business Model:
- Leasing stores and distribution centers reduces fixed costs and allows for scalable growth.
- This model enhances capital efficiency, reflected in its high ROCE of 68.76%.
- Strong Consumer Loyalty:
- Targeting middle and lower-middle-income groups, Vishal Mega Mart has built a loyal customer base through affordable pricing and accessibility.
Risks
- Valuation Concerns:
- At a price band of ₹74-₹78, some analysts believe the IPO may be overvalued relative to its peers, potentially limiting upside for retail investors.
- Intense Competition:
- Established players like Reliance Retail and D-Mart dominate urban markets, creating significant competitive pressure.
- The rise of e-commerce platforms like Amazon and Flipkart further complicates the landscape.
- Dependence on External Vendors:
- Vishal Mega Mart relies heavily on third-party vendors for its products, which may expose it to supply chain disruptions or quality control issues.
- Low PAT Margin:
- While the company has shown impressive growth, its PAT margin of 5.18% lags behind competitors like D-Mart and Reliance Retail.
- Economic Sensitivity:
- Targeting price-sensitive consumers makes Vishal Mega Mart vulnerable to changes in economic conditions, inflation, or policy shifts.
Final Thoughts on Risks and Opportunities
The Vishal Mega Mart IPO offers significant potential for long-term investors, driven by its strong brand presence, scalable model, and growth prospects. However, the competitive landscape and valuation concerns warrant cautious optimism. Investors should consider their risk appetite and investment horizon before subscribing.
Is Vishal Mega Mart IPO Worth Investing In? A Balanced Perspective
Deciding whether to invest in the Vishal Mega Mart IPO requires a holistic evaluation of its strengths, financial performance, and market position. Here’s a balanced perspective to help potential investors make an informed decision.
Why Vishal Mega Mart IPO Could Be a Good Investment
- Strong Market Position:
- Vishal Mega Mart is among the top two offline-first diversified retailers in India, offering a significant advantage in the organized retail space.
- Its vast network of 645 stores across 28 states ensures a steady revenue stream.
- Impressive Financial Growth:
- Revenue grew by 17.41%, and profit after tax increased by 43.78% in the last fiscal year, reflecting operational efficiency and market demand.
- Focus on Middle-Income Consumers:
- The company has carved a niche in serving price-sensitive customers, which forms a large and growing segment in India’s retail market.
- Scalable Business Model:
- The asset-light approach allows Vishal Mega Mart to expand rapidly while maintaining cost efficiency.
- Attractive GMP Trends:
- The Grey Market Premium indicates strong demand among investors, signaling potential listing gains.
Reasons for Caution
- Competitive Landscape:
- Intense competition from established players like Reliance Retail and D-Mart could limit market share expansion.
- The e-commerce boom adds another layer of competition.
- Valuation Concerns:
- While the IPO offers growth potential, some analysts believe the price band of ₹74-₹78 per share may overvalue the company compared to peers.
- Margin Pressures:
- The PAT margin of 5.18% is lower than industry leaders, reflecting challenges in achieving higher profitability.
- Dependence on External Factors:
- Economic conditions, inflation, and policy changes could impact the spending capacity of Vishal Mega Mart’s target demographic.
Expert Recommendations
- For Long-Term Investors:
- Vishal Mega Mart’s growth trajectory, strong brand recognition, and potential for rural market penetration make it a suitable choice for long-term investments.
- For Short-Term Investors:
- The positive GMP trends suggest an opportunity for listing gains, but investors should monitor subscription numbers and market sentiment closely.
Conclusion
The Vishal Mega Mart IPO is a compelling opportunity with notable strengths but also significant challenges. Investors should weigh the growth potential against the risks before subscribing. Conducting additional due diligence and consulting with financial advisors is recommended for tailored advice.
FAQs About Vishal Mega Mart IPO
The GMP for Vishal Mega Mart IPO fluctuates daily based on market demand and sentiment. As of now, the latest GMP value is ₹X (update based on live data). This indicates a potential listing gain of approximately X%.
The IPO opens for subscription on December 11, 2024, and closes on December 13, 2024. Make sure to complete your application before the cut-off time on December 13.
You can check the allotment status on the official website of the registrar, Kfin Technologies Limited, by entering your PAN, application number, or Demat account details. Allotment is expected to be finalized on December 16, 2024.
The minimum lot size is 190 shares, which requires an investment of ₹14,820 at the upper price band of ₹78 per share.
Vishal Mega Mart’s robust financial performance, extensive market presence, and attractive GMP trends make it a potentially good investment. However, risks such as valuation concerns and competitive pressures should be carefully considered.
Conclusion and Final Thoughts
The Vishal Mega Mart IPO represents a significant milestone for one of India’s leading offline-first retail giants. With a strong financial performance, a vast retail network, and a customer-centric approach, Vishal Mega Mart has positioned itself as a key player in the organized retail space.
Key Takeaways
- Financial Strength: The company’s steady revenue and profit growth, combined with a scalable asset-light model, make it an attractive option for investors.
- Market Potential: Its focus on middle and lower-middle-income groups provides a solid growth avenue, particularly in Tier-2 and Tier-3 cities.
- Risks: Competitive pressures, valuation concerns, and macroeconomic factors could impact performance, making it important for investors to proceed with caution.
Who Should Invest?
- Long-term investors: Those seeking exposure to India’s growing retail sector may find Vishal Mega Mart a promising opportunity.
- Short-term investors: Positive Grey Market Premium (GMP) trends suggest potential listing gains, but market conditions and subscription figures should be closely monitored.
Call-to-Action
Stay informed by tracking the latest updates on subscription status, GMP trends, and allotment details. Subscribe to our newsletter or follow us for live updates on Vishal Mega Mart IPO and other investment opportunities.
Disclaimer:
The information provided in this article is for informational purposes only and does not constitute investment advice. Investors are advised to conduct their own research and consult with a financial advisor before making any investment decisions. Past performance is not indicative of future results, and all investments are subject to market risks.